
SSJS: Generate a Dynamic Form Based on a Data Extension

In this SSJS example, we will create a dynamic form based on a Data Extension. This post is not meant as a replacement for Smart Capture, but rather an alternative solution for more customized use cases. Through this post, you will gain a better understanding of:
• How to differentiate between POST and GET requests in CloudPages • How to handle form data in SSJS • How to dynamically create a form based on an existing Data Extension • How to use SSJS and AMPScript together in a CloudPage
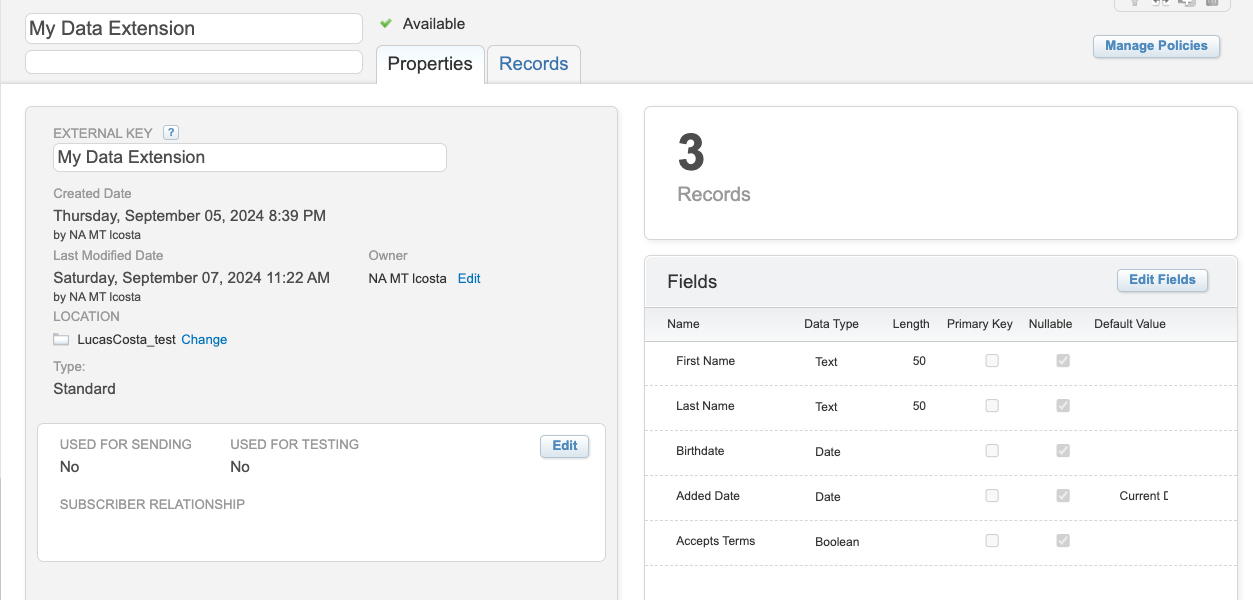 Data Extension used for this example
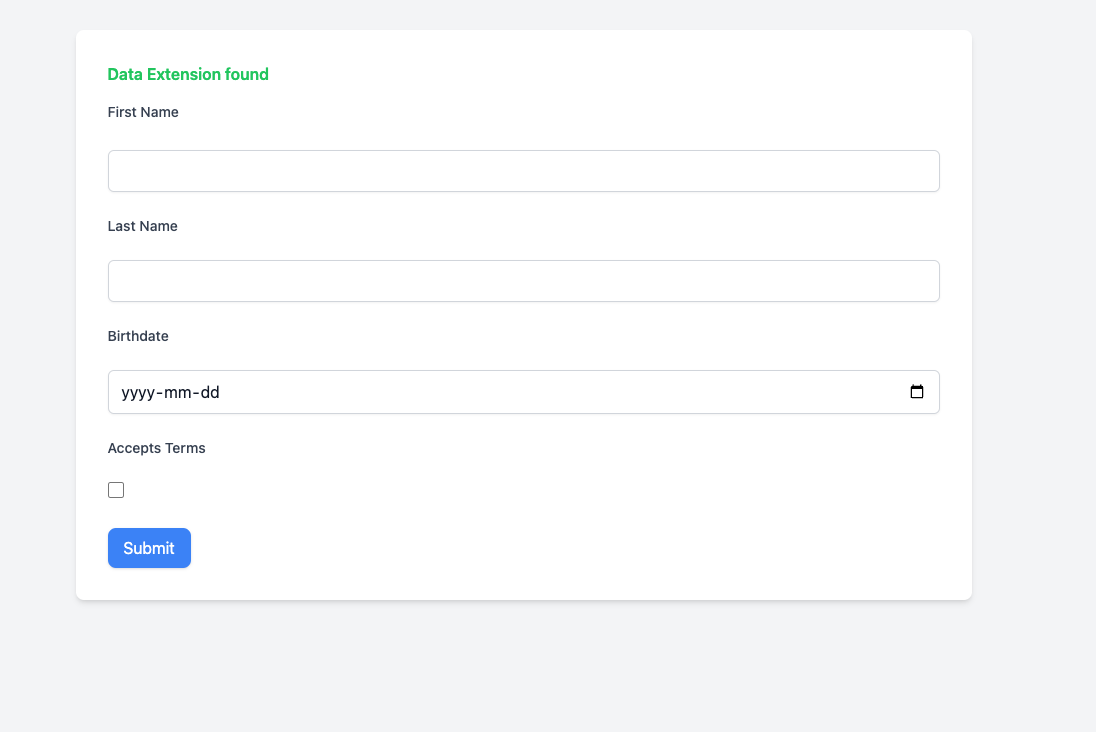 Resulting CloudPage showing the form based on the data extension fields
Where This Could Be Useful
Salesforce Marketing Cloud's Contact Builder allows you to manually add data to a Data Extension, and Smart Capture provides an easy way to generate dynamic forms that save data directly to a Data Extension. However, this example offers an alternative approach that could be useful in scenarios where:
• You need more control over how form fields are generated and displayed. • You want to implement conditional logic or custom validation that Smart Capture might not fully support. • You aim to integrate with additional backend services or perform other tasks before saving data to a Data Extension.
By following this tutorial, you'll learn how to leverage SSJS and AMPScript together for more flexible form handling in CloudPages, providing you with a deeper level of customization and control.
How The Page Works
This solution is built within a single CloudPage that:
• Accepts a Data Extension External Key via the URL: The page captures the external key of the Data Extension from the URL parameter (de). This key is used to retrieve the fields of the specific Data Extension.
• Dynamically Renders a Form: Based on the retrieved Data Extension fields, the form is dynamically generated. Each form input corresponds to a field in the Data Extension and is rendered according to its field type (e.g., text, number, checkbox, etc.).
• Handles Form Submission and Saves Data: Upon submission, the form data is processed and saved into the corresponding Data Extension. The server-side script handles the form's POST request, ensuring data is stored accurately.
• Provides Basic Error Handling: The script includes error handling for situations like missing Data Extension keys or failed data submissions, displaying relevant messages to the user when issues arise.
The Code
Differentiating between GET and POST requests
In this solution, one of the first tasks is to determine whether the request is a GET or a POST. This allows us to either display the form or handle the form submission.
GET Request:
When the page is loaded via a GET request (usually when the user first lands on the page), the primary goal is to:
- Retrieve the Data Extension Key from the URL.
- Generate the Form based on the Data Extension fields.
Here's the basic structure for handling the GET request:
1if (Platform.Request.Method == "GET") {
2  // Check if the 'de' parameter is provided in the URL
3  var de_key = Platform.Request.GetQueryStringParameter("de");
4
5  if (de_key == null) {
6      // If the Data Extension key is missing, display an error message
7      Variable.SetValue("@ShowMessage", true);
8      Variable.SetValue("@Message", "Please provide a Data Extension External Key in the URL.");
9  } else {
10      // If the key is present, retrieve the Data Extension fields and generate the form
11      var de = DataExtension.Init(de_key);
12      var fields = de.Fields.Retrieve();
13      Variable.SetValue("@Form", generateForm(fields));
14  }
15}
POST Request:
When the user submits the form, a POST request is triggered. In this step, we:
- Capture the Form Data submitted by the user.
- Save the Data into the Data Extension.
- Handle Success or Error by displaying a message to the user.
Here's how the POST request is handled:
1if (Platform.Request.Method == "POST") {
2  // Get form data from the POST request
3  var form_data = Platform.Request.GetPostData();
4  var de_key = Platform.Request.GetQueryStringParameter("de");
5
6  if (de_key) {
7      var de = DataExtension.Init(de_key);
8      var data = GetFormData(form_data);
9
10      // Insert data into the Data Extension
11      var result = de.Rows.Add(data);
12
13      // Check if the data insertion was successful
14      if (result == "1") {
15          Variable.SetValue("@Message", "Data added successfully");
16      } else {
17          Variable.SetValue("@Message", "Error adding data");
18      }
19  }
20}
The GenerateForm() Function
The generateForm() function is the core of this solution. It dynamically builds the form by looping through the fields of the Data Extension, generating the appropriate HTML input elements based on the field type. This eliminates the need to manually code forms for every Data Extension, making the form creation process highly flexible and efficient.
How it works
-
Retrieve the Fields: The function takes an array of fields from the Data Extension and loops through them. Each field has a type (e.g., text, number, date), and this type determines what kind of input element will be generated.
-
Create the Appropriate Input Element: Based on the field type,
generateForm()creates the corresponding form element using simple HTML tags (<input>,<checkbox>, etc.). For example, text fields will generate a text input, while boolean fields generate a checkbox. -
Apply HTML Structure and Styling: In this example, basic HTML structure is used to wrap labels and input elements together. Styling can be handled separately (using Tailwind CSS, for instance), but the function focuses on ensuring that the form fields are mapped correctly to the Data Extension's field types.
Here's a breakdown of the code:
1// function to get a form element given the fields
2function generateForm(fields){
3  form = ""
4  for (var i = 0; i < fields.length; i++) {
5      if (fields[i].FieldType == "Text" && fields[i].DefaultValue.indexOf(";") > -1) {
6          // Adding Tailwind classes to the label and text input
7          form += "<label for='" + fields[i].Name + "' class='block text-sm font-medium text-gray-700 mb-1'>" + fields[i].Name + "</label>";
8          form += "<select name='" + fields[i].Name + "' id='" + fields[i].Name + "' class='w-full px-3 py-2 border border-gray-300 rounded-md shadow-sm focus:outline-none focus:ring-blue-500 focus:border-blue-500 mb-4'>";
9              var options = fields[i].DefaultValue.split(";");
10              for (var j = 0; j < options.length; j++) {
11                  form += "<option value='" + options[j] + "'>" + options[j] + "</option>";
12              }
13          form += "</select><br>";
14      }else if(fields[i].FieldType == "Text"){
15          form += "<label for='" + fields[i].Name + "' class='block text-sm font-medium text-gray-700 mb-1'>" + fields[i].Name + "</label>";
16          form += "<input type='text' name='" + fields[i].Name + "' id='" + fields[i].Name + "' class='w-full px-3 py-2 border border-gray-300 rounded-md shadow-sm focus:outline-none focus:ring-blue-500 focus:border-blue-500 mb-4'><br/>";
17      }else if (fields[i].FieldType == "Number") {
18          // Adding Tailwind classes to the label and number input
19          form += "<label for='" + fields[i].Name + "' class='block text-sm font-medium text-gray-700 mb-1'>" + fields[i].Name + "</label>";
20          form += "<input type='number' name='" + fields[i].Name + "' id='" + fields[i].Name + "' class='w-full px-3 py-2 border border-gray-300 rounded-md shadow-sm focus:outline-none focus:ring-blue-500 focus:border-blue-500 mb-4'><br>";
21      } else if (fields[i].FieldType == "Date" && fields[i].DefaultValue == "") {
22          // Adding Tailwind classes to the label and date input
23          form += "<label for='" + fields[i].Name + "' class='block text-sm font-medium text-gray-700 mb-1'>" + fields[i].Name + "</label>";
24          form += "<input type='date' name='" + fields[i].Name + "' value='' id='" + fields[i].Name + "' class='w-full px-3 py-2 border border-gray-300 rounded-md shadow-sm focus:outline-none focus:ring-blue-500 focus:border-blue-500 mb-4'><br>";
25 } else if (fields[i].FieldType == "Boolean") {Key Parts of the Function:
• Field Type Handling: Each field type (text, number, date, etc.) is handled separately to ensure the correct HTML input type is generated. This ensures that the form is appropriately structured for the data types in your Data Extension.
• Label and Input Pairing: For every field, a corresponding label is created, followed by the input element. This ensures a user-friendly form where each input field is properly labeled.
• Dynamic Form Generation: The function returns the entire form as a string, allowing it to be injected directly into the page. This keeps the process highly dynamic, adjusting to the structure of whatever Data Extension you are working with.
Putting it All Together
Now that we've walked through the core components—differentiating between GET and POST requests and dynamically generating form fields with the generateForm() function—let's see how it all works as a complete solution.
How It Flows
-
Accept the Data Extension Key: The page first looks for the Data Extension key in the URL parameter (
de). If it's missing, an error message is shown. Otherwise, we use this key to fetch the Data Extension fields. -
Render the Form Dynamically: Using the
generateForm()function, the form is dynamically built based on the fields retrieved from the Data Extension. Each field type (e.g., text, number, date, checkbox) is mapped to the appropriate input element. -
Handle Form Submission: When the form is submitted, the data is captured via a POST request. The values entered by the user are processed and added to the Data Extension, while providing feedback on the success or failure of the data submission.
-
Display Messages and Handle Errors: Throughout the process, error handling ensures that the user is informed if something goes wrong (e.g., missing Data Extension key, invalid fields). Success or error messages are dynamically displayed based on the result of the form submission.
Complete Code Example
Here's the complete CloudPages code:
1<script runat="server">
2  Platform.Load("Core", "1.1.1");
3
4  try {
5      // Handle GET request
6      if (Platform.Request.Method == "GET") {
7          // Try getting the data extension key from the URL using the parameter "de"
8          // If it's not provided, show an error message
9          de_key = Platform.Request.GetQueryStringParameter("de");
10          Write(de_key);
11          if (Platform.Request.GetQueryStringParameter("de") == null) {
12              Variable.SetValue("@ShowMessage", true);
13              Variable.SetValue("@Message", "Please provide a Data Extension External Key in the URL using the parameter 'de'. Such as '?de=MyDataExtension'");
14          } else {
15              // If the data extension key is provided, get the data extension fields
16              var de_key = Platform.Request.GetQueryStringParameter("de");
17              var de = DataExtension.Init(de_key);
18              var fields = de.Fields.Retrieve();
19
20              // Check if there are no fields or invalid data extension key
21              if (fields.length == 0) {
22                  Variable.SetValue("@ShowMessage", true);
23                  Variable.SetValue("@Message", "No fields found in the Data Extension. Or Data Extension key is invalid.");
24              } else {
25                  // If fields are found, render the form
26                  Variable.SetValue("@RenderForm", true);
27                  Variable.SetValue("@Message", "Data Extension found");
28
29                  var form = generateForm(fields);
30 // Loop through the fields and generate form inputs based on the field typeTo use the form, paste the code into a CloudPage and publish it. Then, pass the de parameter in the URL, setting it to the External Key of the Data Extension you want to generate the form for.
Example: https://your-cloud-page-url.com?de=MyDataExtension
Conclusion
In this advanced example, we explored how to dynamically generate forms in Salesforce Marketing Cloud using SSJS, based on Data Extension fields. This approach offers flexibility and control, making it a great alternative to Smart Capture for custom form handling. By combining GET and POST request handling with dynamic form generation, you can easily adapt this solution to fit various use cases in SFMC, streamlining data collection and management.
The code is available on GitHub for reference and further customization.
Happy coding!
Comments
Join the discussion and share your thoughts on "SSJS: Generate a Dynamic Form Based on a Data Extension".
Privacy-Respecting Comments
You can comment without subscribing to our newsletter. Newsletter subscription is completely optional and separate from commenting.
Leave a comment
You need to be signed in to post comments.
Loading comments...
Loading comments...